
Do You want to create a beautiful studio portrait?
I believe that photographing your own children can be the most difficult for a few reasons:
Reason one, you have less hands. Usually the parent is helping you to coral the child and get them to stay focused. My husband hates photo shoots so he gets frustrated when I ask him to help. So, you are the photographer and rangler.
Reason two, perhaps because of reason one, you have less patience.
Reason three, they know you and know how to push your buttons...
But having listed these reasons, it is still not impossible to get them to cooperate.
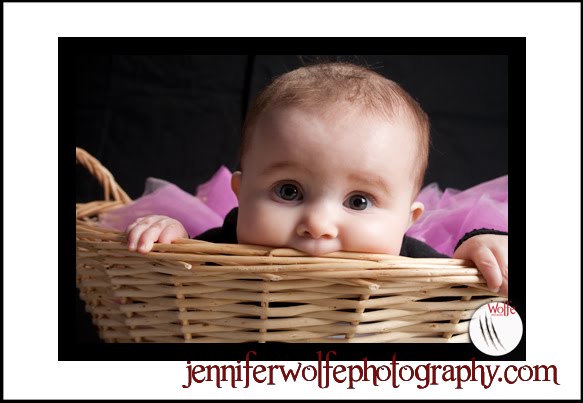
This is a studio shot I did of my daughter on her nine month anniversary. I spent a lot of time trying to figure out what I wanted the final product to look like. I knew I didn't want the lighting to be flat. I didn't want it to look like your Wal-mart or Target portrait studio shot. I wanted it to look professional and stunning. How was I going to achieve that?
I set up my black back drop, which I made out of black canvas fabric, which I bought with a 50% off coupon at Joann Fabrics. I bought metal clamps at Lowes to hold the fabric to the rod of my background stand, which I bought for $100 at BandHphotovideo.com (Sandbags would be really helpful to hold the stand down but I don't have them yet). I bought the basket for $9 at Wal-mart.
First rule for studio shots, make sure to leave 6 feet between your subject and the background. This will let you light your subject and background separately. For a black background you don't want any light spilling on it so leaving the space will help. A gobo is also handy.
Now the lights. This shot has 3 lights. I had one coming over the backdrop onto her head for a hair light- a hair light separates the subject from the background. I had one one the left side as fill, one on the right side as my key. A light meter will help you know what exposure you should shoot at. This was shot at 1/125 of a second at f5.6. My focal length was 28mm and ISO was 100. I shot this with a Canon Rebel XT. My lights are Alien Bees. That is all of the technical mumbo jumbo.
I shot many shots before and after this one. As long as the baby is happy, why not? You never know what you are going to get. I had some pretty cute shots before this one and if I had said, "I've got it, we're finished." I would have missed it. Keep shooting.
Another rule, when your main subject is a person and they are supposed to be the focus, make sure you are focused on them. Not just any part of them, their eyes. Unless you think their knee is more important. If their eyes are not in focus the image is not going to draw you in like they should. When you hold your shutter release down halfway and hear the beep of focus, or when you see the little red rectangle blinking, your camera is telling you where you are focusing. If the red rectangle is blinking over their hand, you can rest assured that their hand will be in focus. You can adjust your focus, and you should. As your subject moves your focus should too.
Here is my SOOC shot:
 Viola! Do you have any questions? Please ask away! Do be sure to follow this blog if you will be joining us regularly. The more followers I have the more prizes and giveaways you can have!
I use Adobe Photoshop CS4 and Lightroom. I evened up her skin with using reduce noise filter. I added saturation and contrast. I brightened up her eyes only slightly. and then..........
Loved the tutorial! I'm so excited to see the rest :) Thanks so much!
ReplyDeleteJenn, you have several ideas in here that I've never thought of! I never knew about the backdrop being 6ft away from your subject so you can light them separately. I also love your advice to just keep shooting. Nice article! :-)
ReplyDeleteThank you! That's what I learned at my expensive school! lol, It was on our test, Why does your subject need to be at least 6ft away from the background? A: to treat them both with light separately. hahaha I too am excited for more posts. I will post what I think you want until I get requests, then I'll do special shoots and posts to address questions and concerns. It will be fun and give me a challenge!
ReplyDelete